The Phoenix Commotion
 You've probably heard of Habitat for Humanity, the home building initiative with which former President and Mrs. Jimmy Carter are involved. Started more than 30 years ago, the organization's goal is to provide decent, affordable housing for those in need.
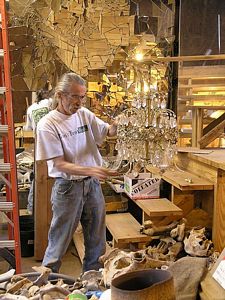
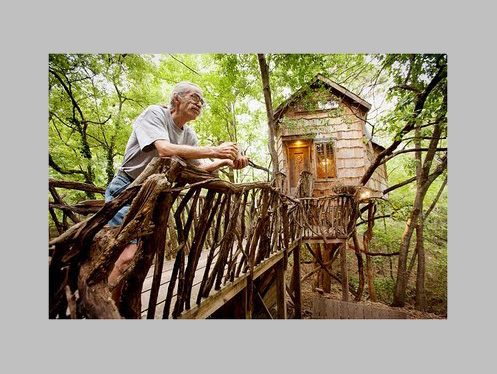
In 1997, Dan Phillips, a Huntsville, Texas resident, started a similar program that eventually became Phoenix Commotion. Concerned about the lack of affordable housing and all the building materials and demolition waste that were going into landfills, Phillips decided to do something about both problems.
You've probably heard of Habitat for Humanity, the home building initiative with which former President and Mrs. Jimmy Carter are involved. Started more than 30 years ago, the organization's goal is to provide decent, affordable housing for those in need.
In 1997, Dan Phillips, a Huntsville, Texas resident, started a similar program that eventually became Phoenix Commotion. Concerned about the lack of affordable housing and all the building materials and demolition waste that were going into landfills, Phillips decided to do something about both problems.
As with the Habitat program, he works to provide housing for low-income individuals, but Phillips has gone a step further in that he uses trash for building supplies. This self-taught carpenter looks at virtually everything as raw materials to use in building houses. In fact, he's saved 80 percent of it from other construction projects, and he finds much of the solid waste alongside the road. Of course, this saves landfill space and money, but Phillips' homes also have a distinctive, whimsical look, inside and out. For example, his houses may feature roofs made of license plates, and ceilings lined with molding thrown out by a local picture framer.
Some of Phillips' more unusual building materials include broken ceramic tiles and mirrors, mismatched bricks, wine corks, DVDs, and bones salvaged from the local cattle yard. Although he has no background in art, somehow he manages to pull off combining such seemingly disparate items. He points to the fact that using similar materials over and over again form interesting patterns. Some of the residents in Huntsville are less appreciative of Phillips' architecture. However, everyone agrees that he's filling a need for those less fortunate, and in using trash as building materials, he's saving landfill space, energy, and natural resources. To learn more about Phoenix Commotion, visit the website at http://www.phoenixcommotion.com/.
All photos are courtesy of Phoenix Commotion.
What's In This Issue
- The Phoenix Commotion
- Peace Fish Artist
- Brazilian Plastic Bottle Art
- Paper Contest
- Beach House Lesson
Summer 2010
Saving the Earth One Fish at a Time
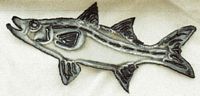
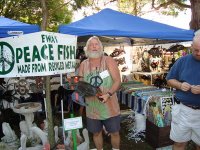 When most people think of giving scrap metal new life, images of recycling cans and old cars may come to mind. However, for Florida artist Mike Ewashenko, unwanted washers, dryers, water heaters, and filing cabinets are the raw materials for his whimsical metal work.
We met Mike one Sunday afternoon while attending an art show on Corey Avenue in St. Petersburg Beach. We learned that he originally made sculptures from concrete, but several years ago, the artist turned to working in scrap metal.
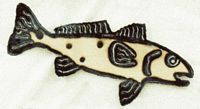
Mike lives near the Gulf of Mexico, and he admits to being a frustrated fisherman. Perhaps that’s why his subjects usually include fish, turtles, seahorses, crabs, and other creatures from the deep.
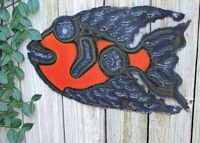 The orange fish pictured on the right is one of Mike’s smiling, happy fish, which we purchased in Pass-a-Grille from his wife, Shelley. To create a piece, he first draws the figure directly on the metal with chalk or crayon. Then he uses an oxyacetylene torch to cut out the shape.
 After cutting, Mike creates “color” using the torch like a paintbrush to draw swirls and stripes. Next he scrubs and rinses the work, and to finish the piece, he sprays it with six coats of clear lacquer to protect it from rusting and fading.
Always on the lookout for scrap metal for his next creation, Mike finds raw materials at local hotels, the winery, and even alongside the road. Many times people drop off scrap metal at his house. To see a video of Mike’s work, visit this website, and you can e-mail him at mewashenko@tampabay.rr.com.
Make a Beach House
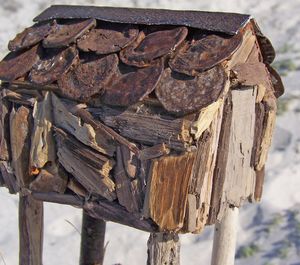
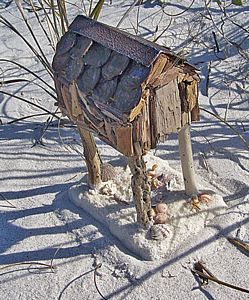 While on vacation, I enjoy picking up small pieces of driftwood, shells, and other interesting objects on the beach and from nearby streets. When my creative muse calls, I make mixed media pieces from found objects I gather on my walks.
One day, I received a package in the mail, so I decided to create a little beach house out of the cardboard box. After constructing the building, I used a glue gun to attach some of the driftwood I'd collected. Smashed, rusty bottle caps made a perfect tin roof, and I topped it with an antiqued strip of aluminum foil.
Four stilts completed the house, which I attached to a wooden base covered with sugary, white sand and shells from the Gulf of Mexico. Now I have my beach house to remind me of the good times I had combing the shoreline and enjoying beautiful sunsets.
You can make something similar using thin cardboard for the house's base. This simple design is made from a square, and you might want to use a scrap of paper to practice making the house before you do the final version. Reusing the cardboard and bottle caps will keep them out of the landfill, and it will save money, energy, and natural resources.
How to:
To practice, cut a scrap of paper so that it’s eight inches square. Fold it in half. Now take one side and fold it so it matches the crease going across the middle. Fold again and crease. Unfold and fold the opposite side in the same way.
Fold the paper in half the other direction, and repeat the steps as before. When you’re finished folding, you’ll have sixteen squares. To construct the house, it’s necessary to do some cutting.
Starting on one side, cut on the three folds, stopping when you come to the first horizontal crease. Turn the paper so the opposite side is in front of you and repeat this step, as shown.
To “pop up” the house, apply glue to one of the inside squares, and swing over the square next to it, gluing it to the first square. Repeat this step for the two inside squares on the opposite side.
Crease the paper along the roofline, and stand up the walls. Glue one outside square over the other. To finish the house, glue the last outside square to the one that remains. See the video on the left to view the previous instructions.
Now that you’ve practiced working with the basic form, you can make the house out of cardboard. When working with cardboard and some papers, artists often use a technique known as scoring to help with folding.
 To start, be sure the cardboard is square. Using a ruler, measure and mark it every two inches all the way around. Now connect the marks so that the cardboard is divided into sixteen squares.
 To make the house, you’ll need to cut as before. If the cardboard is thick, use a utility knife, but be sure to do the cutting on a protective surface. For material that’s thinner, such as a cereal carton, scissors will do.
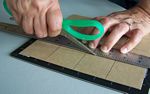
Scoring cardboard or paper involves opening the scissors all the way and using one blade like a knife to draw across the line. Starting on any side, lay the ruler on the line you’ve drawn, and score the cardboard, as shown. Repeat for all lines on all sides.
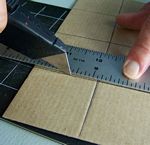 If the cardboard is thick, it will be necessary to cut it with a utility knife. Working on a protective surface, cut on three outside lines, starting at the first horizontal line. Turn the cardboard so the cut surfaces are opposite you, and cut those three, drawn lines, as before.
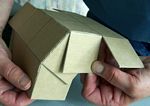 To “pop up” the house, bend at the roofline. Stand up the form, and glue the flaps on either side as you did on the practice model.
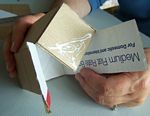
With the basic house finished, you’re ready to use the glue gun to fasten the stilts to the inside and base. Finally, glue on the driftwood, bottle caps, base, and sand. Finish as you wish, and enjoy your beach house!
Tips and Tricks:
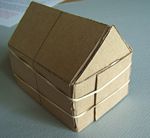 When scoring straight lines, use a ruler as a guide. Use paper clips or rubber bands to hold the practice model and finished house together while they dry.
Drilling holes for the stilts may make it easier to insert them into the base. Before applying the sand, build up the surface on the wood with scrap cotton or unrolled cotton balls. Glue the sand to this surface instead of the bare wood.