Have a Green Christmas!
 Before trim shops and super
discount stores came into being, people decorated their Christmas trees with
whatever they had on hand. Many times they used buttons, scrap fabric, or other
household materials. Recently, we taught some students how to recycle solid
waste to make Christmas tree ornaments. Nearly two dozen kids who attend
Central Middle School in Columbus, Indiana were challenged to create
decorations entirely from solid waste for the tree at kidscommons, our local
children's museum.
Before trim shops and super
discount stores came into being, people decorated their Christmas trees with
whatever they had on hand. Many times they used buttons, scrap fabric, or other
household materials. Recently, we taught some students how to recycle solid
waste to make Christmas tree ornaments. Nearly two dozen kids who attend
Central Middle School in Columbus, Indiana were challenged to create
decorations entirely from solid waste for the tree at kidscommons, our local
children's museum.
The students used materials such as designer
wallpaper and fabric samples, cardboard, polystyrene trays, and jewelry to
create more than 50 ornaments. Kidscommons will sell the decorations, and the
young artists and the museum plan to share the profits. The students decorated
the tree on America Recycles Day. This is an observance held each year on
November 15 to encourage people to recycle and buy goods that are made of
recycled content.
Most people think recycling is gathering newspapers,
cans, bottles and other items and delivering them to a drop-off point, but
collecting solid waste is only the first step. To complete the process, waste
materials are made into new goods, and in order for recycling to work, the
public must buy them. When you see the "green chasing arrows" emblem on a
package, it indicates that the container is made of recycled materials or that
the manufacturer recycled to produce the item inside.
As you shop for
the holidays this year, look for the green arrows and buy recycled. This will
help save natural resources and landfill space, and it will support the
companies that are working to preserve the environment. To have a really "green
Christmas," try recycling solid waste to make your own decorations, as we did.
Following are instructions to create a gingerbread house, gingerbread kids, and
garlands. These are the same decorations that the Central Middle School
students made for the kidscommons Christmas tree.
You will need:

- White, polystyrene trays
- Large cereal box
- Brown acrylic paint
- T-shirt paints for "icing"
- Paint brush and pan
- Scrap ribbon
- White glue
- Compass or awl
- Scissors
- Ruler
- Pencil
- Paper cutter (optional)
How to:

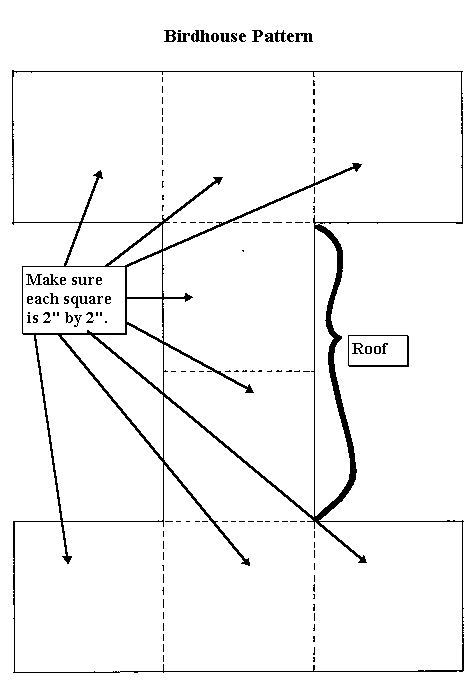
 Print out the pattern (click
here to get pattern) and trace it onto the plain, uncoated side of a 6-inch
by 8-inch piece of cereal carton or other lightweight, scrap cardboard. Cut out
the "I-shape" and fold it as indicated by the dotted lines. This will be easier
if you first lay a ruler on the area and score the cardboard by drawing one
blade of the scissors across it.
Print out the pattern (click
here to get pattern) and trace it onto the plain, uncoated side of a 6-inch
by 8-inch piece of cereal carton or other lightweight, scrap cardboard. Cut out
the "I-shape" and fold it as indicated by the dotted lines. This will be easier
if you first lay a ruler on the area and score the cardboard by drawing one
blade of the scissors across it.
 Step 4
 Step 3
 Step 2
 Step 1
Step 1: Cut out the shape, which will resemble a
“capital letter I".
Step 2: Pop up the house by folding the roof
line.
Step 3: Fold the wall section down.
Step 4: Fold the opposite wall
section down.
 Step 8
 Step 7
 Step 6
 Step 5
Step 5: Now slide the two folded wall sections together
and glue.
Step 6: Repeat folding and gluing of the opposite end walls.
Step 7: Another view showing all of the sides from the bottom.
Step 8: If
necessary, place paper clips on the ends to hold everything in place while the
glue dries.
 Step 12
 Step 11
 Step 10
 Step 9
Step 9: To hide the open, triangular ends of the house,
we'll cover them with cardboard. Cut two- 2" x 3.75" scraps of cardboard. Lay
one piece, plain side up, in front of you. Line up the bottom edge so that it
matches the house, and trace the top.
Step 10: Cut out the shape, and glue
it to the 2" x 2" square at the bottom.
Step 11: Repeat for the other
end.
Step 12: To make holes for the ribbon hanger, find the center of the
roof and mark it. Use the compass point or awl to carefully punch a hole about
¼" inch on either side of the mark.
 Step 16
 Step 15
 Step 14
  Step 13
Step 13: Wash the polystyrene trays in hot, soapy water
and dry them. Break off the edges, and save the pieces for the garland project
that appears at the bottom of this activity. Cut them into the following
pieces: two 2" x 2", two 2" x 3.75", and two 2.75" x 3". Glue the 2" x 2"
sections to the sides of the house, and trace the 2" x 3.75" pieces for the
ends, as you did before.
Step 14: Cut them out, and glue them to the
house. Use rubber bands to hold the polystyrene in place on the sides and ends
until the glue dries.
Step 15: Finally, glue the 2.75" x 3" pieces to the
roof. Space them equally, with the 3" pieces hanging over each end. Allow about
1/8" between the two pieces along the roof line so that the holes are still
visible. That will make it easier to string the ornament for hanging later.
Hold the roof in place while the glue dries, or use rubber bands until it sets
up.
Step 16: Paint all the sections brown to look like gingerbread. To
simulate icing and candy, decorate the ornament with craft paints in
squeeze-type bottles. These are the same paints that are used to decorate
T-shirts, hats, and tennis shoes, and they come in a variety of colors.
 Step 20
 Step 19
 Step 18
  Step 17
Step 17: Use the paints just as you would if you were
working with real icing to make a door and windows, to add decorative touches,
and to hide joints where one edge of the house meets another.
Step 18:
Apply paint to the roof, but avoid covering the holes where the hanger will be
placed later. Allow the paint to dry for twelve hours before continuing.
Step 19: Use the compass point or awl to poke one end of a 14" length of ribbon
through one of the holes in the top of the roof.
Step 20: Repeat on the
opposite side with the other end. If necessary, use tweezers to bring the two
ends through the house until the ribbon meets the roof line.
 Step 24
  Step 23
 Step 22
  Step 21
Step 21: Match the ends, and tie in a knot. Pull the
ribbon up through the house till the knot touches the underside of the
roof.
Step 22: Finally, cut a 3.5" square of polystyrene, and then break
off the corners and sides into an irregular shape. Place the house in the
center. Squeeze white craft paint all along the bottom edge of the house to
simulate snow and to glue it to the base. Set aside for twelve hours to allow
the paint to dry.
Step 23: Finished house with decorated windows and roof
patterns.
Step 24: A perch can be added using a short piece of dowel rod.
*Cutting of the cardboard and polystyrene for the gingerbread house can be
done quickly and more accurately with a paper trimmer, but it should be used
only by an adult.
To make gingerbread boys and girls, you will need:

- Scrap cardboard or polystyrene
- Fabric sample books
- Scrap ribbon
- White glue
- Scissors
- Compass or awl
- Brown acrylic paint
- T-shirt paints for "icing"
- Paint brush and pan
How to:
We used heavy cardboard shapes that were donated by a
local industry to create our gingerbread people. It is unlikely that you will
find the same materials, but you can create something similar by tracing a
gingerbread cookie cutter onto cardboard or a polystyrene tray and cutting out
the shape. Paint the "cookie" brown with acrylic paint. After it has dried, cut
clothing from the scrap fabric and glue it to the body. Use the T-shirt paints
to add "icing" trim and to make facial features. Just squeeze out lines and
dots as you would if you were decorating real cookies. When the paint is dry,
make a hole in the top, and hang by a piece of scrap ribbon.
To make beaded garlands, you will need:

- Wallpaper sample books
- Beads from necklaces or bracelets
- Kite string or fishing line
- Round toothpick
- White glue
- Needle
- Scissors
- Paper cutter
How to:
 Have
an adult use a paper trimmer to cut sample wallpaper book pages into long
strips measuring one inch wide by twelve to fifteen inches in length. Longer
strips make bigger beads. Tightly roll each strip onto the toothpick. After
you've rolled the paper a short distance, place a small amount of glue on the
strip, and roll the bead, gluing it to itself. Continue rolling the bead till
you come to the end of the paper. Glue it shut and hold the end for a few
seconds. Remove the toothpick, and continue until you've made enough beads to
fill at least half or more of the string or line. For the remainder of the
garland, use beads cut from old necklaces and bracelets.
Have
an adult use a paper trimmer to cut sample wallpaper book pages into long
strips measuring one inch wide by twelve to fifteen inches in length. Longer
strips make bigger beads. Tightly roll each strip onto the toothpick. After
you've rolled the paper a short distance, place a small amount of glue on the
strip, and roll the bead, gluing it to itself. Continue rolling the bead till
you come to the end of the paper. Glue it shut and hold the end for a few
seconds. Remove the toothpick, and continue until you've made enough beads to
fill at least half or more of the string or line. For the remainder of the
garland, use beads cut from old necklaces and bracelets.
In order to thread the garland, find a needle with an
eye large enough for the string or line to fit through, but small enough to go
through the beads. In some cases, it will be possible to thread the garland
without a needle. Starting with one of the necklace or bracelet beads, take the
needle in and around it several times to secure the end. Alternate stringing
the wallpaper beads with those from the old jewelry. To fasten the last bead in
the garland, take the needle in and around several times, as you did when you
started. Finally run the needle under the thread to knot it.
*We also made a long garland composed of seven or
eight necklaces just by hooking one necklace to another at the fastener. We
chose necklaces of only one color and type-in this case they were white,
simulated pearls. Also we paid special attention to the size and shape of the
beads, and we tried to choose necklaces that were similar, so that the finished
garland would look attractive.
To make polystyrene garlands, you will need:
- Polystyrene trays
- Kite string or fishing line
- Scissors
- Needle
How to:
 Polystyrene is a material used to make trays for packaging
produce, baked goods, and meat. You can string small, white pieces together to
make a garland that looks like the popcorn that many people use to decorate
their trees. Saving the edges from the trays in the gingerbread house activity
is a good way to use the scraps, but this garland will use many trays! To
start, break the polystyrene into one-inch pieces.
Polystyrene is a material used to make trays for packaging
produce, baked goods, and meat. You can string small, white pieces together to
make a garland that looks like the popcorn that many people use to decorate
their trees. Saving the edges from the trays in the gingerbread house activity
is a good way to use the scraps, but this garland will use many trays! To
start, break the polystyrene into one-inch pieces.
Measure kite or fishing line so that it's nine to
twelve feet long, cut it from the spool, and thread the needle. Knot the line,
and thread it through the first piece of polystyrene, running it to the knot.
Wrap it around this piece several times, and run it through again.
Begin making the garland, taking care to thread the
scraps through their centers. Continue until the line is full, and then take
the needle in and around the last piece several times and through it to fasten
the garland. To make the ends more secure, have an adult fasten the end pieces
with a glue gun.
Tips and Tricks:
You'll find many items in our supply list around your
house, but you may have to go to other sources for some materials. For example,
employees of interior design firms and paint stores will share discontinued
fabric and wallpaper sample books. If you're unable to find wallpaper books,
substitute scraps of gift-wrap or other decorative paper or fabric.
We filled in bare spots and added bits of color to our
tree by placing silk flowers that were donated by a home-decorating store. Gift
shops often discard old or damaged merchandise, and you may be able to salvage
parts for ornaments. Also, florists may donate scraps of ribbon, dried flowers,
picks, beads, and other decorative items. You can gather lots of old jewelry
for garlands and ornaments just by asking relatives and neighbors.
We started collecting solid waste and creating our
decorations on Make A Difference Day. Visit the
Make A Difference Day site to
learn how you can make your community a better place to live. See
America Recycles
Day on the Web to discover how you can help save natural resources, and
sign up to win some great prizes.
 A
special thank you to Lincoln-Central Neighborhood Family Center staff members
Diane Doup and Randy Allman who collaborated on the tree decorating project
with us, and to the staff at kidscommons, a Columbus, Indiana children's
museum, for displaying and selling the students' ornaments.
A
special thank you to Lincoln-Central Neighborhood Family Center staff members
Diane Doup and Randy Allman who collaborated on the tree decorating project
with us, and to the staff at kidscommons, a Columbus, Indiana children's
museum, for displaying and selling the students' ornaments.
Also, thanks to the many individuals who donated items
and to the owners or staff members of the following businesses and
organizations who also helped provide solid waste materials: Bartholomew County
Recycling Center, Four Seasons Retirement Center, Heart and Home, Mona Wirth
Interiors, Pollert Design Associates, Rock-Tenn, Terra Cotta, and The Boutique.
And, of course, thanks to art teacher Leslie Khune and
the wonderful Central Middle School students who created our fantastic
ornaments! Last names were not used to protect the privacy of the students.
They are as follows: Brandi B., Nicole B., Christi B., Aly B., Catherine B.,
Britteny C., Chelsea C., Abbi C., Colin C., Shannon F., Orrin K., Laura K.,
Nicole L., Jennifer P., Sarah R., Emily S., Elizabeth T., Mandy W., Pan Pan W.,
and Anna W.

Return to Main Web Page
