![]() When we say
something is biodegradable, we're referring to its ability to break down into
raw materials and go back to nature. Plastic is a man-made material that
doesn't biodegrade. It would be hard to imagine life without plastics, so
they're probably here to stay. However, you can help save the environment by
reusing plastic to make art.
When we say
something is biodegradable, we're referring to its ability to break down into
raw materials and go back to nature. Plastic is a man-made material that
doesn't biodegrade. It would be hard to imagine life without plastics, so
they're probably here to stay. However, you can help save the environment by
reusing plastic to make art.
A recycling code is a number that appears inside a small triangle somewhere on plastic containers. Your recycling center uses the numbers to inform the public as to which plastic materials are accepted for recycling at their facility. Not all recycling centers accept all types of plastic, so paying attention to the numbers is important.
While many containers from your grocer's deli and bakery are recyclable, one, in particular, can be used as an art material. Clear plastic, with the #6 recycling code embossed on it, can be shrunk in an oven! Known as polystyrene, the plastic can be decorated with permanent markers or colored pencils and then made smaller by baking it for a short time in a toaster oven or home oven.
There are many useful gifts and other items that can be created by shrinking these #6 plastic containers. Some of them are key chains, pendants, garden markers, and Christmas tree ornaments. Once you start shrinking plastic, you'll probably come up with many of your own ideas, and besides saving money on art supplies, you'll help conserve natural resources, energy, and landfill space.
| #6 Clear, plastic lids or flat containers from the
deli or bakery Aluminum foil Pencil Ruler Scissors Hole punch Sandpaper Craft scissors (optional) Metal file (optional) Sharpie Fine Point Permanent Marker |
Colored pencils (optional) Cookie sheet Spatula Oven mitt or hot pad Oven or toaster oven Necklace cord (optional) Ribbon (thin for ornaments) |
|
| Before we start, there are a few points to keep in mind. Probably the most important thing to remember is that for safety's sake, you must have an adult use the oven to shrink plastic. Also, be sure to work in a well-ventilated area. | |
| You can expect an item to shrink to nearly half its original size. In other words, if you start with something that's six inches long, it will be about three inches in height after baking in the oven. The plastic will thicken, too. | |
| In general, you should first cut out the shapes, and sand the side you plan to decorate to help the marker or colored pencil stick better to the plastic. If needed, punch a hole in the top. Please note that holes will be smaller on finished pieces, too, so it may be necessary to punch two holes that “overlap” each other. After the prep work is done, draw and color designs with the colored markers or pencils. | |
| We'll learn how to shrink plastic to create several items that will make great gifts for just about any occasion. Before starting, trim the raised edge from lids or other plastic so that you're working with a flat piece. Using a ruler and pencil or marker to first draw lines will help guide your cutting. | |
These days, nearly everyone carries a set of keys, so making a key chain decoration is a good way to reuse plastic. Make several for gifts, or create one for yourself. Start with a scrap of #6 plastic, draw guidelines so the piece measures about three inches by four inches, and cut out the shape. If you wish, use craft scissors to make a fancy edge. Sand, decorate with markers or colored pencils, and punch a hole in the top before shrinking.
A piece of jewelry that hangs from a cord worn around the neck is called a pendant. Use a pencil or marker and ruler to draw guidelines on a piece of #6 plastic that measures about two inches by four inches. Cut out the shape using craft scissors, sand, and decorate with the markers or colored pencils. Be sure to punch a hole near the top of the pendant before baking.
![]() Moms and grandmas love to receive flowers and
plants, and if you buy something that's meant to be planted in a yard or
garden, your gift can be enjoyed for a long time. When you buy a flower or
plant from a nursery or garden shop, it will come with a small, plastic marker
that lists its name and explains the type of sun exposure that's best for it.
Many people place this tag in the ground next to the flower or plant so they
can recall its name and how to care for it.
Moms and grandmas love to receive flowers and
plants, and if you buy something that's meant to be planted in a yard or
garden, your gift can be enjoyed for a long time. When you buy a flower or
plant from a nursery or garden shop, it will come with a small, plastic marker
that lists its name and explains the type of sun exposure that's best for it.
Many people place this tag in the ground next to the flower or plant so they
can recall its name and how to care for it.
You can reuse #6 plastic containers to make your own markers. Since plastic doesn't biodegrade or break down when exposed to water or air, the tag will be sturdy, and reusing the material will help save natural resources and landfill space. Make the marker about four inches high and two inches wide with a point on the bottom. Sand the plastic. On the widest part of the tag, copy the name of the flower or plant. You may want to include the sun exposure directions.
![]()
![]() The three types
of sun exposure are full sun, part sun, and full shade. If you prefer, make
symbols that stand for the care it should receive. For example, for full sun,
you might draw a sun with dark glasses. Decorate the marker with designs and
patterns. The three types of sun exposure are full sun, part sun, and full
shade. If you prefer, make symbols that stand for the care it should receive.
For example, for full sun, you might draw a sun with dark glasses. Decorate the
marker with designs and patterns.
The three types
of sun exposure are full sun, part sun, and full shade. If you prefer, make
symbols that stand for the care it should receive. For example, for full sun,
you might draw a sun with dark glasses. Decorate the marker with designs and
patterns. The three types of sun exposure are full sun, part sun, and full
shade. If you prefer, make symbols that stand for the care it should receive.
For example, for full sun, you might draw a sun with dark glasses. Decorate the
marker with designs and patterns.
To get ideas for ornaments, think about those you already display on your tree. Some of the designs that are common include candy canes, wreaths, snowflakes, gingerbread boys, snowmen, angels, bears, holly, Santa, elves, reindeer, bells, stockings, nutcrackers, presents, and stars. Another way to find ideas is to look at Christmas card designs.
Sand a piece of plastic, draw the shape with permanent marker, and cut it out using plain or craft scissors. Finish drawing the subject or parts of the design, and color all the areas with marker or colored pencil. Punch a hole in the top for hanging. Make lots of ornaments for your tree, or instead of using bows on presents, decorate packages with shrunken plastic designs.
After you've created your design, it's time for the fun part, which is shrinking the plastic! Have an adult place a foil-lined cookie sheet in the home oven or toaster oven, and preheat to 350 degrees.
| When you see the plastic flatten again, have the adult use a spatula to remove it from the oven. Immediately place the piece on a cool surface, and within ten to fifteen seconds, flatten the shape with the spatula. Now let it cool before handling |
Shrinking the plastic just one piece at a time, place the artwork with the marker side up on the foil, and bake until the plastic shrinks and flattens. Please note: the plastic will shrivel and curl, but it's important to wait until it flattens before removing it.
Tips and Tricks:
In order to see how the artwork will shrink on the plastic, it's very important that you do a test piece before spending a lot of time drawing and coloring an item. Not all #6 plastics are the same, so experimenting with different types will show you which containers or lids are the best ones to reuse for this project.
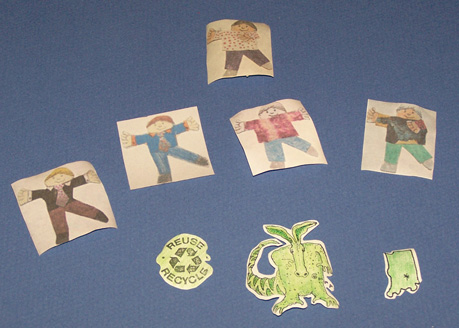
Some of the examples shown include key chain fobs, pendants, and plant markers made from Styrofoam meat and produce trays. If you use this material, be sure to wash and dry thoroughly before handling. No sanding is necessary. Just color with markers, and punch a hole, if necessary, before baking. This material is harder to work with, and it must be flattened immediately after taking out of the oven.
Nearly 80% of American homes have access to plastic recycling programs, but not all communities accept every type of plastic. Find the recycling code or number inside the triangle that appears on the product, and then check with your recycling center to see if they accept that particular type.
Safeplay Systems, an American playground equipment company, reuses 12,000 to 15,000 plastic milk jugs to make each playground. Since the company began in 1989, employees have saved more than 7,000,000 containers from going to landfills!
© 2008 Marilyn J. Brackney
Volume 22 No. 3
Return to the main holidays Page
Select this to
choose other holiday activities..