![]() While people all
over the world are deeply sorry for the loss of so many lives in the United
States on September 11, 2001, we're also sad for the families and friends of
those who died. Thousands of children lost relatives such as parents,
grandparents, brothers, sisters, aunts, or uncles.
While people all
over the world are deeply sorry for the loss of so many lives in the United
States on September 11, 2001, we're also sad for the families and friends of
those who died. Thousands of children lost relatives such as parents,
grandparents, brothers, sisters, aunts, or uncles.
As soon as Americans heard about the tragedies, they rushed to give blood and make donations to help the Red Cross, Salvation Army, and others working to aid the victims' families. While you're too young to donate blood, perhaps you helped raise money in a school fund drive.
At times like this, everyone wants to help and show his support, so we're joining an international effort to remember those who died on September 11th. We hope you'll take part, too. Created by Clapper Publishing of suburban Chicago, The Angel Project is an activity in which people are invited to make ornament-sized angels in memory of the victims of this national tragedy.
The company is sponsoring a drive to collect the handmade items, and the angels will be delivered to New York City, Washington, D.C., and Pennsylvania for a special memorial service just before Christmas. The deadline for receiving the artwork is December 7th, 2001. Seeing the angels will let the survivors know that people everywhere are thinking of them, and making the figures is another way you can help to remember their loved ones and show your support of America.
Please note that the deadline for receiving angels has passed, but you can still make angels to remember the victims of September 11th. Perhaps you can display them in your own community.
Hundreds of public employees lost their lives in the September 11th tragedy in New York City. They include members of the police and fire departments, New York Port Authority workers, and Emergency Medical Technicians who died while rescuing thousands of people from the World Trade Center. This art project honors the more than 300 brave firefighters who lost their lives.
You'll need an extra pair of hands for this activity, so make this a family project and work with your mom or dad to create the angel. Everyone likes to help, and the simple instructions for another angel appearing at the end of this project will be easy for a little brother or sister to understand. Maybe you can help him or her create the figure.
Art Tools:
Art Materials:
The main parts of the angel are the body, gown, head, hands, hat, stars, arms, and wings. First we'll learn how to make each piece, and then we'll paint and assemble the angel.
The base is made from a rectangular scrap of lightweight cardboard or poster board. We'll roll a half circle into a cone shape to form the body. It will be easier to bend the cardboard one direction or the other, so decide which is the best way to form the cone by slightly bending the material in both directions. The cardboard bends the easiest along the grain, so lay out the half circle in this direction. In other words, make this the longest side of the rectangle, and cut the cardboard so that it measures 7 inches by 14 inches.
Find the center at the bottom of the long side of the cardboard, and make a mark at 7 inches. We'll use a string compass to make the half circle. Tie and knot the string onto the unsharpened part of the pencil near the bottom. Cut the string so that it's 7 inches long. Place the end of the string on the center mark, and hold it in place. Keeping the string straight, and starting at the right or left bottom, draw a half circle that reaches to the top of the cardboard. Continue drawing till you complete the half circle.
Cut out the shape, and with the straight side up, hold it at the top and sides with both hands. With your thumbs toward you and your fingers on the other side, gently bend the cardboard in the middle and curve the top or straight side toward you. Use both hands to roll the cardboard around, overlapping one side onto the other, forming a cone. Decide how wide you want the body to be, and clip it in place with paper clips. Now staple it at the bottom, so that the cone keeps its shape. Tape it in several places where the edges overlap, inside and out. Cut off the very tip of the cone-about 1/8".
The angel's gown is made of two pieces, a longer dress that covers the entire cone, and a shorter top that goes over the shoulders and arms. If you can see the masking tape through the material you've chosen for the gown, cover it with the same fabric to hide the masking tape. Just make another half circle and wrap it around and fasten it to the cardboard.
To make the main part of the gown, fold an eighteen-inch square of fabric, right sides together, into fourths, so that you can find the center of the material. Mark the middle. Open the fabric, and place it right side down on the table.
![]() Using a piece of string, make another compass that is
eight and one-half inches long. Place the end of the string on the mark, as
shown. Have your partner hold down the material while you draw a circle. Cut it
out, and make a small hole in the center of the fabric.
Using a piece of string, make another compass that is
eight and one-half inches long. Place the end of the string on the mark, as
shown. Have your partner hold down the material while you draw a circle. Cut it
out, and make a small hole in the center of the fabric.
Place the cloth right side up on the wax paper, and seal the raw edge or hem of the gown with T-shirt decorating paint. Allow the gown to dry on the wax paper for a day. If you prefer, you can hem the bottom of the gown instead of using paint. Just be sure to allow extra fabric for the hem.
To make the top of the gown, tie and knot another string onto the pencil to make a string compass that is five inches long. Working with a piece of fabric that is eleven inches square, fold it into quarters and mark as before. Once again, place the end of the string on the mark, and draw the circle. Have someone hold down the material while you work.
Cut out the top, and make a small hole in the center of the cloth. Open the circle and place it face up on wax paper. Seal the raw edge of the neckline and hem with the fabric paint or hem this piece, too. Set aside to dry.
The head and hat are made using papier-mâché. Have an adult poke a hole in the Ping-Pong ball, and run the 3/8"x4" stick through till it touches the other side. In a small pan mix a little of the wallpaper paste according to the manufacturer's directions, or you can use white glue mixed with equal parts of water as a paste.
![]() It may be easier to work on the head if
you place the stick in a soda pop bottle, leaving both hands free. Use a cotton
swab to make the angel's nose. Cut the cotton part from the stick, and tape it
to the center of the ball by running small strips across the cheek and over the
nose onto the other cheek.
It may be easier to work on the head if
you place the stick in a soda pop bottle, leaving both hands free. Use a cotton
swab to make the angel's nose. Cut the cotton part from the stick, and tape it
to the center of the ball by running small strips across the cheek and over the
nose onto the other cheek.
![]() Tear the newspaper
into small strips. Dip one strip into the paste. Remove the extra paste by
running it between your thumb and finger. Lay the strip over the nose,
smoothing and attaching it to the cheeks. Keep covering the nose with the
strips, and cover the rest of the head with one layer of small, torn pieces of
newspaper and paste. Leave the head to dry in the soda bottle.
Tear the newspaper
into small strips. Dip one strip into the paste. Remove the extra paste by
running it between your thumb and finger. Lay the strip over the nose,
smoothing and attaching it to the cheeks. Keep covering the nose with the
strips, and cover the rest of the head with one layer of small, torn pieces of
newspaper and paste. Leave the head to dry in the soda bottle.
The practice golf ball should be slightly larger than the Ping-Pong ball, so we'll use it as a form for the firefighter's hat. Again, have an adult make a hole in the ball, and push the other 4" stick through to the other side. If you use a practice ball with holes, just tape the stick in place. Draw a line around the center or circumference of the ball. The top half will be the form for the crown of the hat.
Cover the ball tightly with a small piece of plastic wrap, and keep it in place with a rubber band around the stick. The plastic wrap will make it easy to remove the crown of the dried hat from the ball. Again, it will be easier to work on the form if you have both hands free, so place the stick in the other soda bottle.
Repeat the pasting steps as outlined above, but apply layers to the top half of the ball only. After you've applied one newspaper layer, apply another of colored comics and then add four more layers, alternating between newspaper and comics. Changing back and forth between the two types of newspaper will allow you to easily see what you've already covered. Leave the form in the bottle, and set it aside to dry for about twelve hours. Remove the hat after awhile, so the inside can dry.
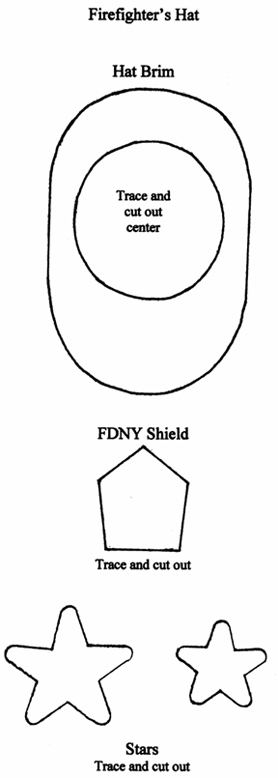
After the crown has dried, you're ready to attach the brim and shield. Use the pattern provided as a guideline, and adjust your brim, as necessary. Click here for patterns, print them and trace onto a small piece of lightweight cardboard or poster board. Cut out the brim, and remove the center. Slip the cardboard shape over the crown, and fasten it in place with thin strips of masking tape, running the tape from the brim onto the crown in several places.
Attach the brim using the wallpaper paste and newspapers. Cover the entire brim on both sides with two layers of newspaper. Shape the brim while it's damp, with the widest part or back of the hat arching downward. Replace the hat on the ball, and leave it to dry in the bottle for several hours. Remove the hat later, turn it over, and let it set overnight so that the inside can dry, too. Trace the shield onto a small piece of cardboard, cut it out and cover it with one layer of papier-mâché.
The patterns for the stars are on the same sheet with the hat brim and shield. If you want to add stars to the figure, trace the patterns onto a small scrap of lightweight cardboard or poster board, and cut them out. Working on wax paper, cover the shapes with one layer of papier-mâché, and set them aside to dry.
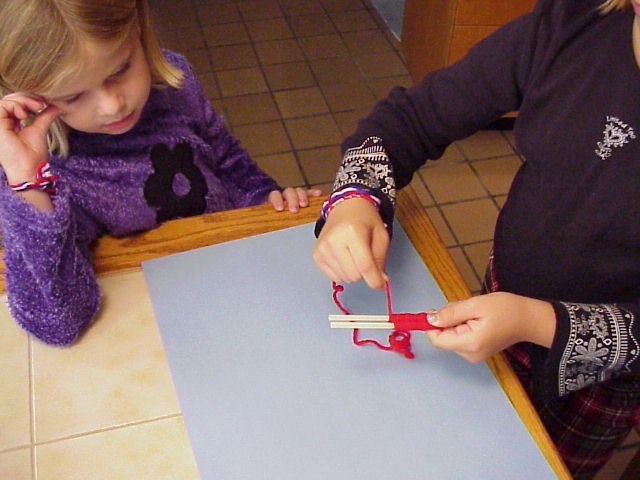
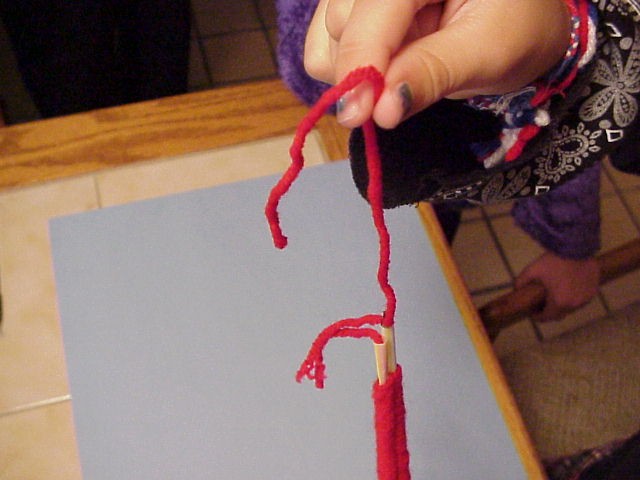
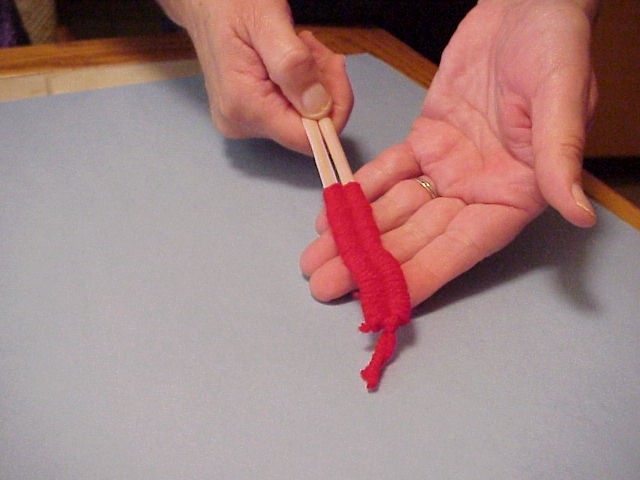
The arms are made from two ten-inch long pieces of thin, flexible wire like stovepipe wire. Use pliers to tightly twist the ends together. Now wrap one wire around the other till you come to the end, and twist those ends together, too. Have an adult use an awl or other sharp tool to make holes for the arms near the top on either side of the cone. Set the arms aside till the final assembly.
Fold two five-inch paper doilies in half, and use white glue to fasten them on the insides so they'll stay closed. Set the wings aside till time to assemble the angel.
![]() If you want to make something that looks like the
seams on a firefighter's helmet, use the T-shirt decorating paints or heavy
string to add the lines on top of the hat. When the helmet has dried, draw a
guideline on the crown that divides it in half front to back. Now repeat,
dividing it in half side to side. Finish by drawing lines in between each
section, so that the crown is divided into eight pie-shaped pieces. Glue the
string or cord onto the lines, or use T-shirt decorating paints to go over
them. Set the helmet aside to dry for a day.
If you want to make something that looks like the
seams on a firefighter's helmet, use the T-shirt decorating paints or heavy
string to add the lines on top of the hat. When the helmet has dried, draw a
guideline on the crown that divides it in half front to back. Now repeat,
dividing it in half side to side. Finish by drawing lines in between each
section, so that the crown is divided into eight pie-shaped pieces. Glue the
string or cord onto the lines, or use T-shirt decorating paints to go over
them. Set the helmet aside to dry for a day.
![]() Acrylic paint comes in a variety of skin
tones, so you can choose the nationality of your angel. Paint the head, and set
it aside to dry in a bottle. When the face has dried, add the eyes and mouth
using a small brush. We'll use wooden ice cream spoons for the hands. Paint the
front and back in a tone to match the face, and darken the color to paint the
lines representing the fingers and thumb. If you wish, add fingernails using
flesh-colored paint that has been tinted with a little white paint. Set the
hands aside to dry on wax paper.
Acrylic paint comes in a variety of skin
tones, so you can choose the nationality of your angel. Paint the head, and set
it aside to dry in a bottle. When the face has dried, add the eyes and mouth
using a small brush. We'll use wooden ice cream spoons for the hands. Paint the
front and back in a tone to match the face, and darken the color to paint the
lines representing the fingers and thumb. If you wish, add fingernails using
flesh-colored paint that has been tinted with a little white paint. Set the
hands aside to dry on wax paper.
![]() Paint the helmet after the T-shirt decorating paints
or glue have dried. Make the shield silver or gray, and print FDNY in acrylics
or marker. Finally, paint the stars gold or silver and accent with glittery
T-shirt paint, if you wish. Paint two pieces of string to match the stars. This
will be used to fasten them on a "rope" and later tied to the angel's hand. Set
the stars and string aside to dry on wax paper.
Paint the helmet after the T-shirt decorating paints
or glue have dried. Make the shield silver or gray, and print FDNY in acrylics
or marker. Finally, paint the stars gold or silver and accent with glittery
T-shirt paint, if you wish. Paint two pieces of string to match the stars. This
will be used to fasten them on a "rope" and later tied to the angel's hand. Set
the stars and string aside to dry on wax paper.
![]() Hair can be made using fake fur or yarn. If you use
fake fur, have an adult attach it with a hot glue gun. To make hair with yarn,
wrap it around a 5" piece of mat board or other heavy cardboard about six
times. Carefully slip off the yarn, and tie and knot it in the middle of the
bundle.
Hair can be made using fake fur or yarn. If you use
fake fur, have an adult attach it with a hot glue gun. To make hair with yarn,
wrap it around a 5" piece of mat board or other heavy cardboard about six
times. Carefully slip off the yarn, and tie and knot it in the middle of the
bundle.
Cut the ends on both sides. To make the hair fuller, untwist each strand, making the hair curly. If you need more hair, just repeat these steps. Have an adult use a hot glue gun to attach the hair to the top of the head. Leave it this length, or if you prefer, cut and style it. If you want to make a mustache, use small pieces of yarn tied in the middle and untwisted to make it fuller. Have an adult glue it on with the hot glue gun.
Dress the angel and add the arms, hands, and stars
Place the longer gown over the cone, and find the armholes near the top. Cut the material or poke holes with an awl, and run the wire through. Bend the wire to make the shoulders and elbows. Use masking tape on the inside to make the cone stronger where the wires enter.
Add the hands by taping the sticks onto the ends of the wires. Be sure to place them so the thumbs are up or on top. Place the top or smaller circle of fabric on top of the cone. Pose the arms so that just the hands show. If you want to form sleeves, tack the cloth in place.
Add the head, hat, wings, and pose the figure
![]() To attach the head, drop the stick through the hole
in the cone, and run masking tape over the dowel rod, fastening it to the
inside. Have an adult use a hot glue gun to attach the wings to the back, with
the straight sides up and the curved ones down.
To attach the head, drop the stick through the hole
in the cone, and run masking tape over the dowel rod, fastening it to the
inside. Have an adult use a hot glue gun to attach the wings to the back, with
the straight sides up and the curved ones down.
Again use a glue gun to attach the shield to the front of the helmet, and glue the angel's hat to his head, with the widest end at the back. Also use a hot glue gun to fasten the stars onto the strings. Tie the strings onto the angel's wrist inside his sleeve. Finish decorating the figure and posing it.
Finally, use the marker to sign and date your angel on the inside of the cone. For privacy reasons, you may want to use your first name only. Include the name of your city, state or province and country. Make a drawing or write a message to the person who will receive the figure. Carefully pack the drawing or note and your angel in a box, and ship them to the address listed under Tips and Tricks.
Create a Clothespin Angel
![]() This angel is much easier to make, so it will be a
great activity for you to do with a younger brother, sister, cousin or friend.
All you need are a clothespin and a few supplies.
This angel is much easier to make, so it will be a
great activity for you to do with a younger brother, sister, cousin or friend.
All you need are a clothespin and a few supplies.
Make the eyes, nose and mouth with a marker on the head of the clothespin, and sign your angel by printing your first name, city, state or province, and country on the side or clip part of the clothespin.
The angel's gown is made from a scrap of fabric or tissue paper that is at least ten inches square. Make a string compass as we did before. Tie and knot the string onto the unsharpened part of the pencil near the bottom. Cut the string so that it's 4.5 inches long.
Fold the fabric, right sides together, into fourths, so that you can find the center of the material. Mark the middle. Open the fabric, and place it right side down on the table. Place the end of the string on the mark, and have your partner hold the fabric as you draw a circle. Cut it out with pinking shears, and make a small hole in the center of the fabric.
Carefully slip the gown over the angel's head. Turn the figure upside down, standing the angel on its head. Have an adult use a glue gun to fasten the gown to the clothespin from the inside, gluing the dress to the wood. Turn the angel over, and glue yarn on top for hair.
To make the wings, fold the paper cupcake holders in half, and then into quarters. Glue them shut with white glue. Have the adult fasten them, curved sides out, to the back of the angel using the glue gun. If you wish, add a thread or string for hanging. Write a personal note or draw a picture to go along with your angel, and send it to the address below.
While the first directions given are for a firefighter, it's easy to change the plans to make other types of angels. Just leave off the hat and change the hairstyle.
Creating the figures is a great way to recycle materials. For the first angel, you can reuse an old Ping-Pong ball for the head, and substitute short pencils for the dowel rods. You probably have a handkerchief or man's dress shirt that can be cut up and used for the gown, or use a fabric remnant or sheet. Look around your house or school for scrap cardboard and some of the other materials, too.
If you have no tracing paper to transfer the hat brim, shield, and stars, you can use a pencil and a light source. Just go to a window, turn the pattern over, and carefully trace the lines with a soft pencil. Now retrace the shapes on the front, transferring them to the cardboard. If necessary, go over the lines so you can see them more easily.
Elsewhere at The Imagination Factory, see Cast a Paper Valentine to learn how to create a paper heart. And don't forget to visit Show Your Colors and Make a Freedom Bracelet to learn how to make a patriotic wristband to show your support of the United States.
A special note to parents and teachers: If you need help in learning how to talk to children about tragic events in the news, visit Mr. Rogers Neighborhood.
©2001 Marilyn J. Brackney (updated 2018)
Volume 15 No. 3
Previous
Activities
Select this to choose other activities.